Look Pro, Part IX: Proper Cycling Caps

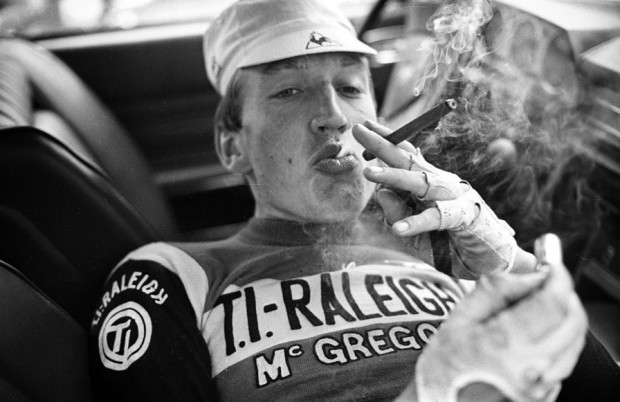
Rule #22 is perhaps the most complicated Rule amongst the (currently) 85. Part of the complexity springs from the fact that we are all very attached to this small cotton cap. Off the bike, it was once a badge used to recognize one of our own; now it has been taken over by the hipster crowd which subsequently ruined it for those of us who wore this hallowed garment with pride. Our response has been to refrain from wearing this garment off the bike and resort to other badges – such as Rule #33 compliance – to identify our own. That said, some of us, in the spirit of Rage Against the Machine, refuse to lay down arms and are fighting to take the power back and callously wear our caps regardless. (Guilty.)
Further complexity is due to its provisioning one to wear a cap during any activity directly related to cycling; maintaining your machine, while kitting up, placed jauntily askew while consuming a post-ride recovery beverage at your favorite watering hole. We’ve deliberately refrained from laying out a clear definition as to what constitutes a cycling-related activity, but the verbose description should give you a feel of the spirit within which to govern this Rule.
What The Rules don’t touch on at all is what type of cap is acceptable and precisely how it may be worn. This small, simple garment is at least as complex as a pair of bib shorts or a jersey, and just as with those items, there is a Pro way to wear them, and a noob way to wear them. Especially in light of a recent rash of non-compliant caps coming onto the market, I thought it as good a time as any to outline the definition of a proper cap and how to wear it.
- The material. A proper cycling cap is made of cotton, and is as cheaply made as possible. They used to cost a few dollars. That’s like a nickel in dollOZ. Now they are upwards of $15 or $20. A small strip of elastic should be somewhat carelessly sewn together at the back. A good cap should have almost no quality-control in its making, leading to each cap having its own size or positioning of panels. Each cap has its unique character and should be carefully chosen based on it. There has been a recent slew of new caps (made by both Pearl Izumi and some by our beloved Castelli) that have a sweatband sewn into the cap. This is strictly forbidden.
- The visor. This is the most important part. Visors should be short. This is because the purpose of a cap is to be worn while riding, and when the head is tipped down as you move to the V-Locus, you need to be able to see up the road to where the guns will detonate without tilting your head up in order to see past the visor. As with the above, a new wave of caps (again by Pearl Izumi and Castelli) have been made with a too-long visor. These visors are also strictly forbidden in general and for wearing under the helmet in particular.
- The Three-Point System always applies. Especially when worn without a helmet in pre or post-ride activities. No exceptions here; forward or backward, just always, always, always follow this system.
- Worn under the helmet, the helmet and cap must form a cohesive unit. Start with the cap, and slide it down over the back of the head to the nape of the neck. Then pull the visor down towards the eyes until the bottom edge of the visor is just above the eyebrows. Smooth out the wrinkles in the cap, as those will feel weird under the helmet. Next, the helmet goes on with the front of the helmet pushed down snug towards the visor of the cap. If part of the visor disappears under the helmet, you’ve gone too far, and if any part of the front of the cap shows, you haven’t gone far enough.
- Visors can be flipped up, especially when worn backwards. Worn forward, it is better to keep the visor down, especially under a helmet. If for some reason it must be flipped up, keep the bottom line of the cap low to the eyebrows. If it is being flipped up under a helmet, it helps an awful lot if you’re also in the midst of riding to a win in a Monument, your name starts with Phillipe and ends with Gilbert, or both.

